

2.2.4. Adding a New Risk Model
Risk models, like other models, are accessed through the Model Editor, which is launched via TOOLS >> Model Editor..., through the Shift+E keyboard short cut, or from the toolbar:

The Risk Rule Editor dialog can be launched by clicking on the Create Risk Model button at the bottom left of the Model Editor dialog (1) or by right-clicking on an existing Risk model and selecting Edit Risk Rules from the context menu that pops up. A Risk model is defined by one or more rules, and the rules are generated by applying the dialog's five interactive fields more or less sequentially.
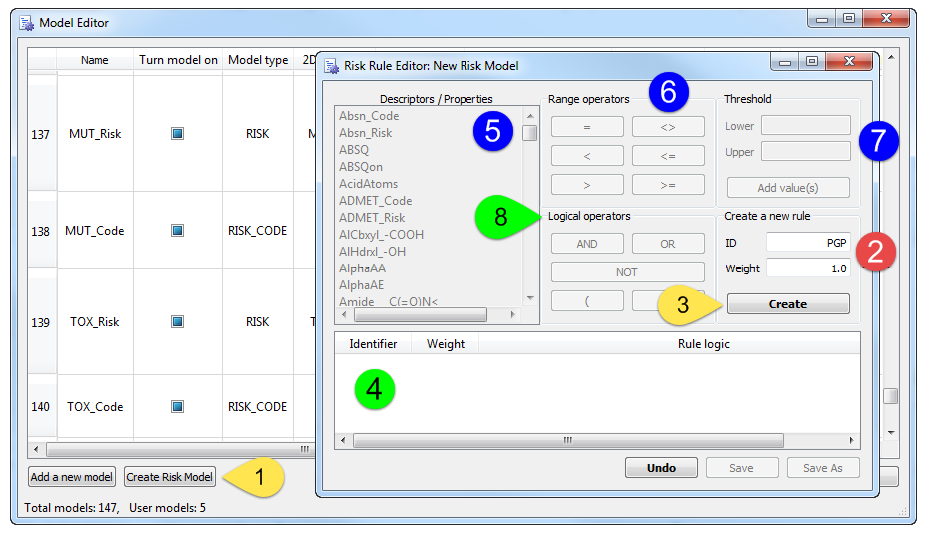
The first step is to create a rule ID, assign a weight to it and Create the rule (2); once that is done, clicking on the Create button (3) will generate an entry in the rules table (4) that runs along the bottom of the dialog. Criteria are added to the rule by selecting a Descriptor or Property (5), a relational operator (6) and specifying one or two Thresholds (7). Logical operator buttons (8) allow you to combine multiple criteria within a single rule or group them by inserting parentheses appropriately.
The figure below illustrates the first few steps in building a Risk model central nervous system (CNS) activity. The left panel shows what the dialog looks like as the first rule (PGP) about being a P-glycoprotein substrate is being added (1). The right panel shows how the dialog looks as the second clause in a second rule (BBB) is being added. The log of the brain-to-blood ratio (logBB) has been entered (2) and it is time to select a relational operator (3).
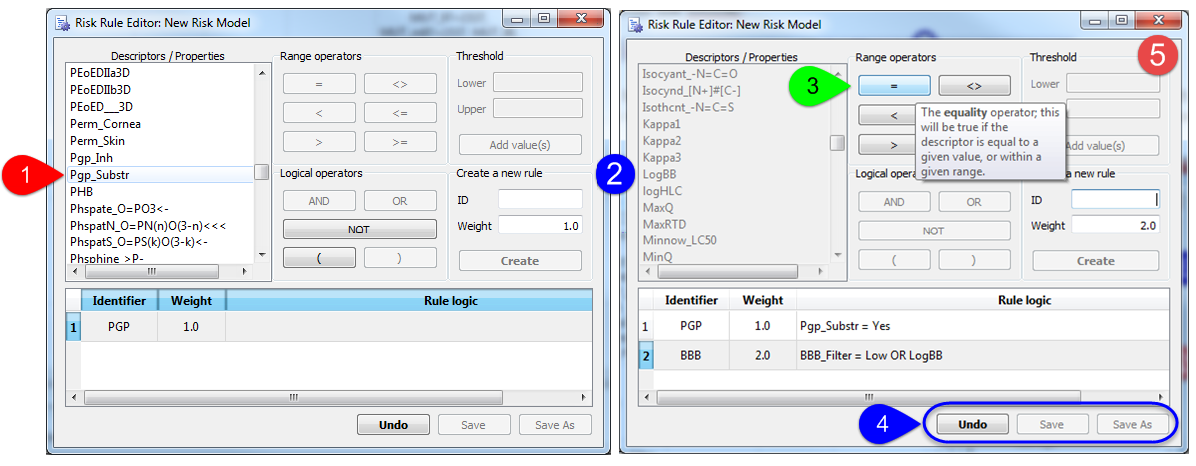
As elsewhere in ADMET Predictor, hovering over a button or field will pop up a tool-tip explaining what that item does. Note that fields and buttons are enabled only as appropriate to the syntax; this is to prevent you from creating uninterpretable rules like:
"= NOT logBB = ( = 17 OR ) )"
The Undo button is always enabled, whereas the Save and Save As buttons are disabled until all rules entered are logically complete (4). Once they are, the Save As button will be enabled and you can use it to give your new Risk model an appropriate base name (e.g., CNS) and save it to disk. Doing so will create two new models, one for the Risk score (CNS_Risk) and the other for the Risk codes (CNS_Code), adding the suffixes automatically.
Once a Risk model has been saved, adding or changing a rule (you can edit an existing rule by clicking on its entry in the rules table) will enable the Save button so you can update the model file. The exception to this is that you can open the Risk models Simulations Plus provides to modify them or add rules of your own, but you will have to save it under a new name; the Risk Rules Editor will not let you overwrite the original model files.
Click on the red "X" at the top right of the dialog (5) to close it.