

3.2.8. Exporting and Saving Models
A project can be saved by clicking on the Save project button in the Model Performance Grid, by way of the Ctrl+S keyboard shortcut or through the ADMET Modeler menu bar: File >> Save Project. You will be prompted to select a destination folder for the project, then for a name to give the new folder that Modeler will create there to hold the model and support files. The current model base name will be provided as a default. Opening the project (File >> Open or Ctrl+O) will restore the performance grid as well as all data and parameter settings from the saved Modeler project.
An individual model of the grid may be saved by right-clicking on a cell and choosing the Save Model option from the context menu that pops up. This will copy the model file corresponding to the architecture for that cell into the selected folder along with the parameters file, log file, data file, rms file, pno file, and other files related to the selected model.
Once you are satisfied with an individual model's performance and are ready to make it available for future use, you are ready to export it. You do this by right-clicking on the appropriate cell in the Model Performance Grid and selecting the Export model... option in the context menu that pops up (blue arrow). Doing so will launch the Export a model dialog.
A default model name is provided, but you should replace that with something more informative (1). This cannot duplicate the name of an existing model, a Simulations Plus descriptor, or existing attribute name, nor can it be a number; 2E1 would be acceptable because the capital E is not interpreted as an "exponent" flag.
Note: Certain attribute names similar to the MeltingPoint spreadsheet attribute used by the Meylan solubility models are reserved. You should avoid using meltingpoint, melting point, melting.point, melting_point, or meltpt as a model (or attribute) name. Any of these variants, regardless of case, will be converted internally to MeltingPoint, with consequences that are very difficult to foresee.
Transform and Type (2) are set automatically for you when you launch this dialog from the Model Performance Grid, as are the 2D and 3D model file names (3). By default the file names will be the same, because 2D models can always be applied to 3D structures but the reverse is problematic. The Type is dictated by the model type you are exporting and so is disabled here. This is an ANNE classification model, so the file type is C-ANNE.
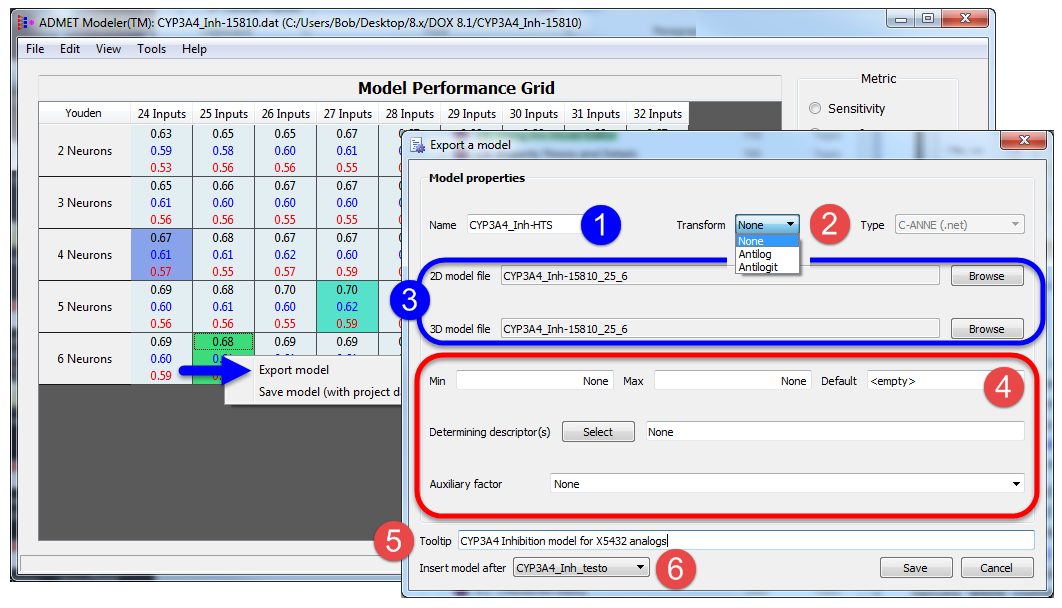
If the dependent variable was log transformed in Modeler before model building began, the Transform menu would have been set to Antilog. If you build a model on data that was brought into Modeler as logs but want to report results on a linear scale, you will need to set Transform manually to Antilog.
An Antilogit option is provided to accommodate models where the logit transform was applied to the dependent variable before modeling was begun. This transform can work well when the range of the endpoint lies between 0 and 1, as it does for fraction unbound in plasma. The hum_fup% and rat_fup% models were constructed in this way by generating an equation attribute column in the spreadsheet to use as the dependent variable, then setting Transform to Antilogit in Export a model window. Specifying an Auxiliary Factor (4) of 100 puts the final output on a percentage basis. Support for applying the logit transform itself within Modeler is not yet implemented in ADMET Predictor.
Providing a Min value and a Max value for the output based on the range of values in your training set can avoid undue extrapolation or nonsensical predictions (e.g., zero for an endpoint that is always positive). The default entry of "None" is appropriate here, since the example is a classification model.
Specifying a Determining descriptor means that the Default value will be returned instead of a predicted value for rows where the Determining descriptor is missing. If one or more Determining descriptors are specified along with a negated auxiliary factor, a prediction will only be returned for rows where the first Determining descriptor is not equal to the Auxiliary factor - e.g., not equal to 0 if the Auxiliary factor is set to "~0".
A value of "None" is acceptable for all other fields in this part of the dialog. It should be evident from this that you should not try to name a model or attribute None.
The Tooltip (5) is attached to the column header when the attribute is displayed in Predictor's spreadsheet. None is attached by default and you are not required to supply one, but providing an informative one is helpful to users. At a minimum, it should generally indicate the nature of the modeled endpoint, its units and the aggregate error if individual confidence values are not provided.
The initial order of columns in the spreadsheet follows the order of entries displayed in Model Editor. You can use the selection list at the bottom of the dialog (6) to specify where your new model should be placed in the list, which controls where it will show up in the spreadsheet.