
ADMET Modeler builds ensemble models, with each ensemble made up of individual (sub)models that share parameters. Each is, however, trained using a different subsample of data from the training pool. None of the component models "sees" the data held back in the test set during construction.
Parameters common to all model building methods - i.e., those involved in partitioning the data set and preprocessing descriptors - are specified in the Variable Selection and Modeling Protocol pages, as is the Model Type you want to use to construct the models that make up the ensemble. Each of the four different model types - artificial neural net (ANN), support vector machine (SVM), kernel partial least squares (KPLS) and multiple linear regression (MLR) - has specific settings, however, and each has its own Method Settings page.
A shared theme to the settings pages is that they allow you to control the complexity of the models you generate. To paraphrase Albert Einstein: "A [model] should be as simple as possible but no simpler." Considering more architectures takes more time, but considering too few architectures risks missing the best configuration. A good strategy is to start with a fairly wide input descriptor range at a moderate level of granularity, then to focus in iteratively to find the best region in the performance grid.
The settings for each model type, their meaning and how they interact with parameters set elsewhere (e.g., general descriptor parameters) are discussed in detail in 3.4: Modeler Theory and Details, but general considerations are sketched out here. Which model type is best depends on the data set but we generally find that ANN ensembles (ANNEs) have the most robust predictive performance. In part this is because the component models are nonlinear and in part because they employ an early stopping technique that reduces the risk of overtraining - i.e., generating overly complex models that fit noise in the data at the expense of predictive accuracy for compounds outside the training pool.
Artificial neural net settings
The ANN Settings page allows you to control the range and granularity of model architectures to be examined, in particular the neuron (1) and input counts (2).
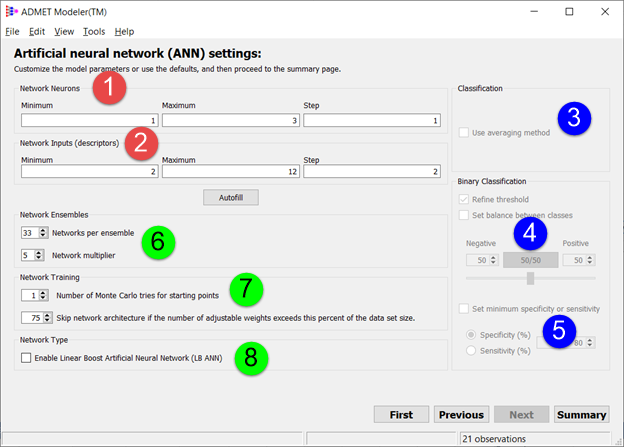
Clicking on the Autofill button will show you what the default starting settings are. They typically cover a wide range with a large step size - i.e., a low sampling density. You might start with 20 to 120 inputs in steps of 20, then examine 40 to 80 in steps of 5, then 45 to 55 in steps of 1. Good corresponding neuron settings might be, for example, 1 to 9 in steps of 2 for the first stage and 2 to 8 in steps of 1 for the second and third stage. It is a good idea to try two or three different random number seeds at each stage to get a feel for how stable the pattern that you see is.
Classification settings: The page shown is for ANNE classification based on a binary dependent variable. When ANNE regression has been chosen, the options at the right of the page are disabled. Turning on Refine threshold (3) allows Modeler to adjust the critical classification threshold so as to increase the confidence you have that a given prediction is correct; it is turned on by default. The Confidence Analysis section in Modeler Theory and Details provides a more complete explanation of how this works and why it is desirable.
When Use averaging is turned OFF, each network in the ensemble sets its classification threshold by an independent analysis of its output and the other options in the Binary Classification field are disabled. When Use averaging is turned ON, however, the outputs are averaged across all networks in the ensemble to determine a common threshold. This can be advantageous when working with unbalanced data sets, i.e., those in which one class significantly outnumbers the other.
By default, ADMET Modeler weights classification errors in proportion to the reciprocal of the class size, which ends up giving sensitivity and specificity roughly equal (50:50) weight. That may not be appropriate in some cases, however. In a regulatory context, for example, false negatives are typically more "costly" than false positives, so you may want to shift that balance to put more weight on getting the positives correct (4). You can also set a minimum acceptable sensitivity or specificity (5); there is necessarily a trade-off between these performance metrics, so at most one can be applied at a time. This setting operates independently from the minimum sensitivity setting when identifying the best model architecture after model building; in most cases it will be better to use that post-processing tool or differential class weighting (4).
Averaging is applicable to multiclass models, but the items in the Binary Classification field are not applicable; they are disabled whenever the dependent variable takes on more than two values.
Other ANN Settings: Settings in the remaining fields are enabled for both regression as well as for classification but are not ordinarily adjusted from session to session. The Number of Monte Carlo tries... option in the Network Training field (7) specifies how many different starting weight randomizations will be evaluated for each ANN and the maximum number of adjustable weights to allow. The latter is expressed as a percentage of the number of observations. Any architecture that exceeds the specified maximum will not be built.
By default, ADMET Modeler trains 165 ANNs for each architecture and retains the 33 best-performing ones for inclusion in the final ensemble model. The Network Ensemble settings (7) allow you to modify the number retained and the default multiple of 5.
Finally, the Enable Linear Boost Artificial Neural Network option (8) enables or disables linear boost weights (currently, regression models only).
Support vector machine settings
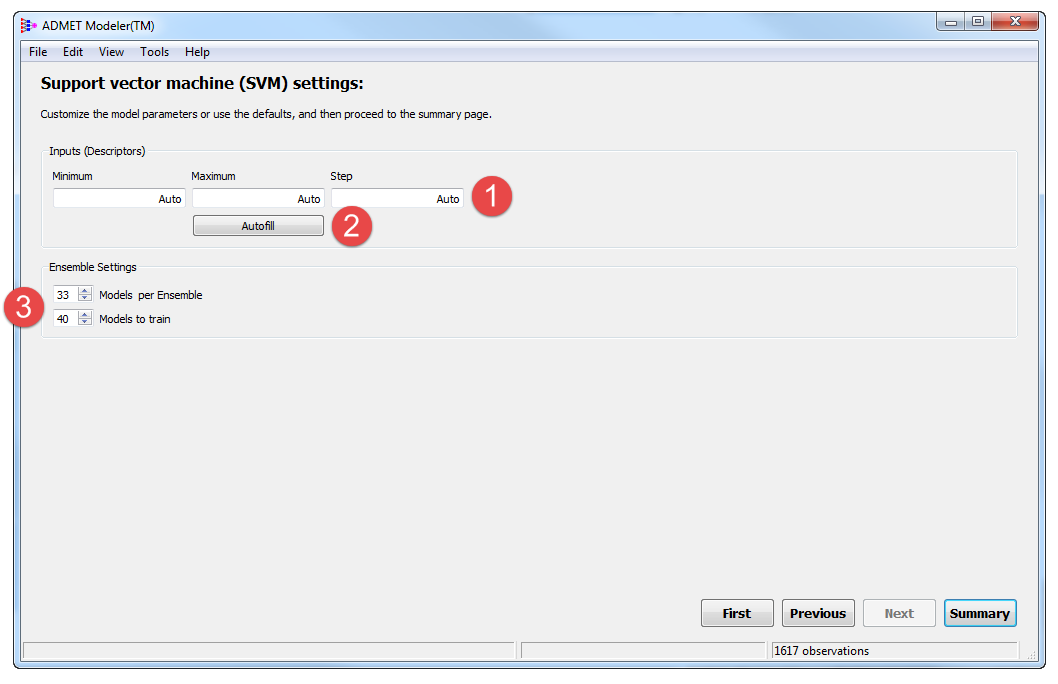
The SVM settings page allows you to vary how many inputs are considered and what the step size within the range should be (1). The "Auto" specification supplied by default provides a wide range of input counts on a fairly low-resolution grid, i.e., the step size is relatively large. The exact settings are determined by the number of observations and the number of descriptors selected on the Variable selection page. You can see what the settings actually are by clicking on the Autofill button (2). As with ANNE (see above), it is a good idea to start with a wide range and focus in iteratively.
You can also adjust the number of models to train and how many to include in the final ensemble model (3).
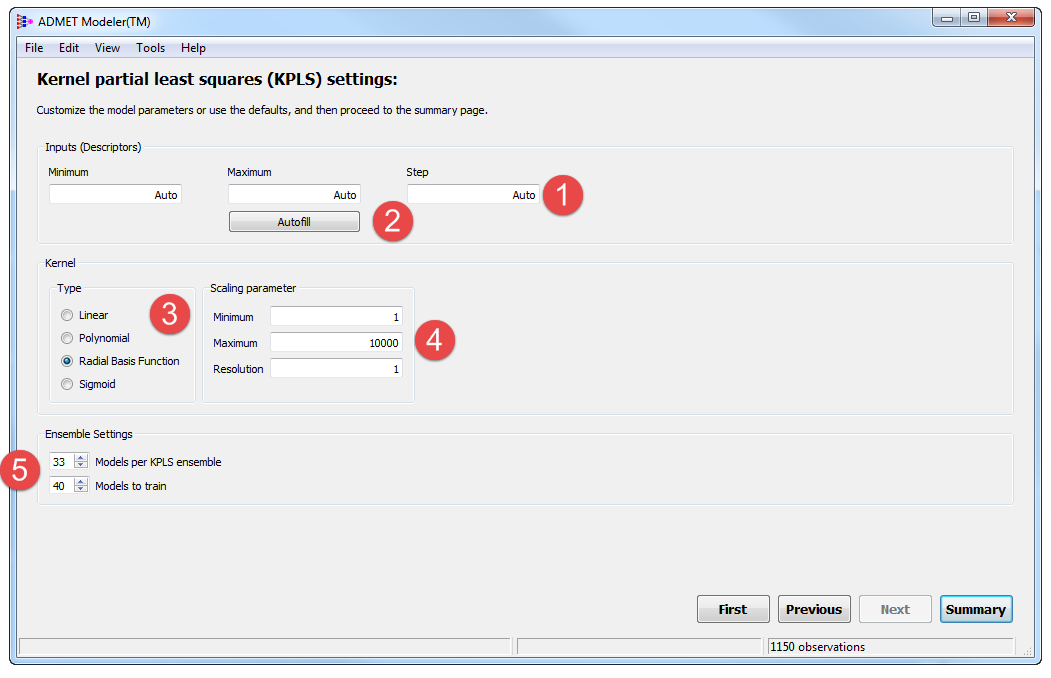
The Inputs field on the KPLS settings page allows you to set the range of inputs to be considered as well as the sampling density (step size) within the range (1). "Auto" provides for reasonable initial settings, but you will likely want to "zoom in" once you have identified a smaller range to explore in detail. Clicking on the Autofill button (2) will display the specific settings. The Kernel field (3) indicates which transform to apply to the input descriptors before running the actual analysis. Radial basis function is selected by default. It is a Gaussian transform of the Euclidean distance between points in the descriptor space that works well in many cases. The Linear option is equivalent to "ordinary" PLS. The Sigmoid kernel is akin to what we use in our artificial neural networks.
Ordinarily you need not worry about Scaling parameter settings (4), but they are provided for the convenience of experienced KPLS users. The linear kernel does not make use of the parameter and it has slightly different meanings for the other kernels.
As with the other methods, you can set the number of models to train and the number of models to retain in each final ensemble (5).
Multiple Linear Regression
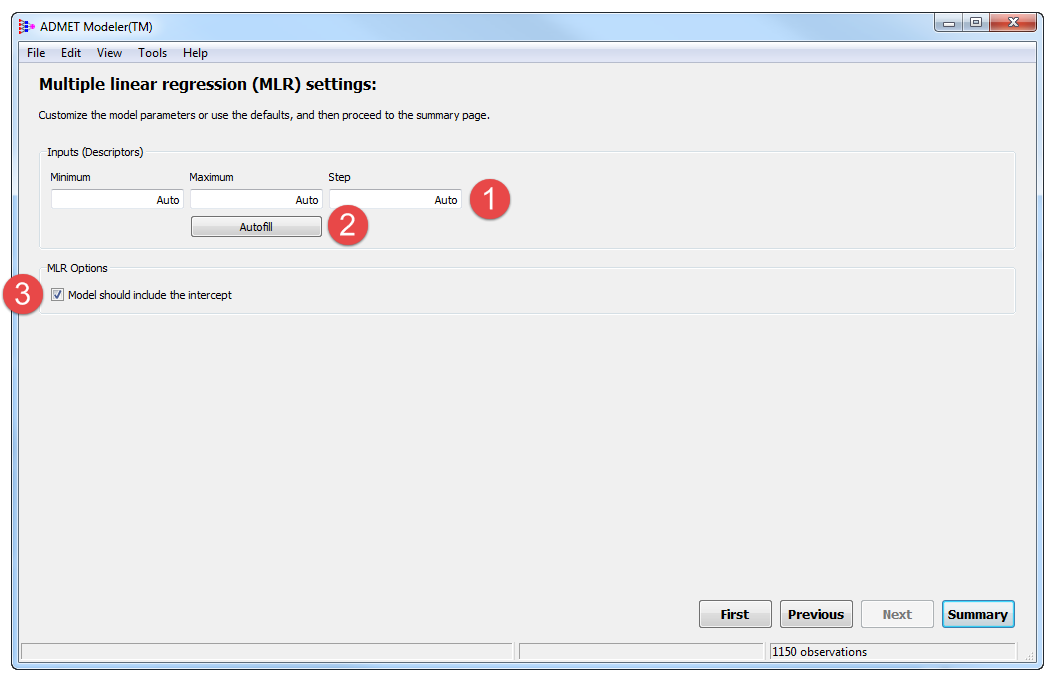
The MLR Settings page is the simplest of the four method settings pages, in part because the models are singletons rather than ensembles. It lets you set the range of inputs to include in the model as well as the step size across the range (1). "Auto" provides good starting values but you are free to specify the settings instead, as you will likely want to do after running an initial, coarse-grained analysis. Clicking on the Autofill button (2) will display the specific settings. You can also choose whether or not to include an intercept in the regression (3); if this is not checked ON, the regression will be forced through the origin.